Table of Contents
This chapter describes how and why Plug-ins get combined into a Product that is specific for a site.
As already explained in the section called “Java, Eclipse, RCP”, a product combines selected Plug-ins with configuration files and an OS-specific launcher.
There are several CSS products:
Archive Engine, Archive Config Tool,
Alarm Server, Alarm Config Tool are all examples
for CSS products.
When we talk about
The CSS Product,
however, we usually refer to the CSS user interface product
that the end users see.
A product that is just called css or maybe css-xyz because it has
been pre-configured for users at an institute called XYZ.
A product that includes Probe, Data Browser,
maybe the alarm table and tree displays.
The fastest way to create a new site-specific CSS Product is the product template available at https://github.com/ControlSystemStudio/org.csstudio.template.product. Refer to its README.md for more. The following sections explain in more detail how such a product is structured and may help to understand how the template is organized.
Why is there more than one CSS product? Why can it be difficult to select the required Plug-ins?
Plug-ins contain the Java code and associated content like online help
for some CSS functionality.
One example would be a databrowser Plug-in that implements
the Data Browser.
System integrators at different sites might prefer some Plug-ins over others,
for example one operator interface tool over another.
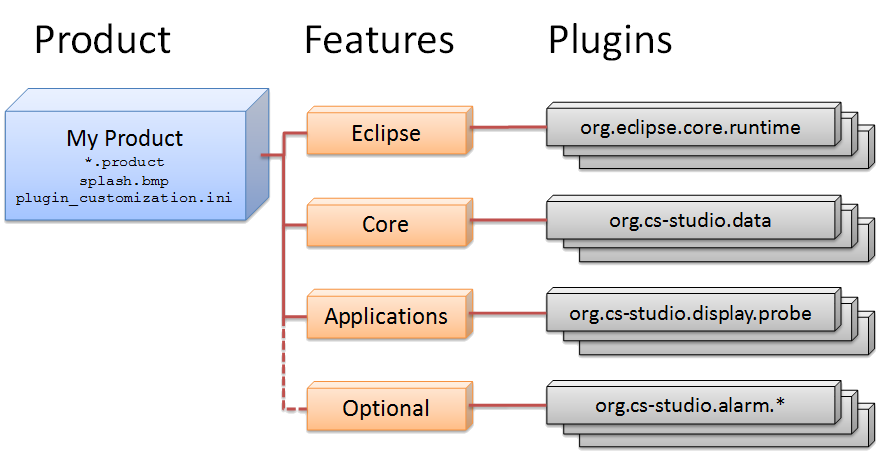
A product is a collection of the plugins chosen for use at a site. A product definition file can in fact directly list the desired plugins. In practice, however, plugins are usually first combined into Features, and the product is then assembled from these features. Features allow grouping of plugins by functionality. This way it is easier to add or remove a certain functionality from the product.
For example, an
optional feature
can list plugins that are not needed by every user of a product.
When building the product, such an optional feature may be
excluded from the product, but it is made available in an online
update repository. Users who down-load the product can then add
the optional feature as desired via the Help,
Install New Software ... menu.
Products also contain the default settings, the
plugin_customization.ini file described
in Chapter 6, Hierarchical Preferences.
To users of CSS it is most convenient when the suitable settings
for their site, for example EPICS Channel Access addresses, web links,
LDAP server hosts for authentication are already “built in”,
so that there is usually no need to adjust any preference settings
after installing CSS onto their office computer.
When a site needs basically the same collection of plugins, i.e. one product, but with different settings to support for example different networks where the product is used, there are two options:
Build different products.
These products are assembled from the same features and plugins, but since they include different
plugin_customization.inifiles, they are in the end different.This option might be most convenient to end users because they have a product that works for them out of the box, but is more work for the maintainer of these products.
Build one product with several
*.inifiles.Since fundamentally only different versions of the
plugin_customization.iniare needed, simply include several in the product plugin:plugin_customization.ini- Shared settings.main_control_room.ini- Adjustments for the main control room.test_network.ini- Adjustments for the test network.- ... maybe more.
These configuration files can be offered as separate downloads from the web site, or they can be included in the product plugin. In the latter case, it can be helpful to keep the product plugin un-packed:
In the feature that adds the product plugin to the overall product configuration, assert that the product plugin is not packed into a
*.jarfile but left as an unpacked directory. In the feature editor this is done by checking the option to “Unpack the plug-in archive after the installation”. In the feature file itself, the product plugin should then not include the optionunpack="false"
Either way, users now have various
*.inifiles available and can run the product with the appropriate one from the command line:css -pluginCustomization /path/to/e.g./test_network.ini
You can also prepare batch files or shell scripts that start the product with these customization files.
This option is more convenient for the maintainer of the product because it remains one product, but requires end users to run CSS with the correct
*.inifile resp. starter script.
So it may be obvious by now that most sites need a custom-built CSS product to provide a site-specific selection of plugins with suitable default settings. There is one more reason to publish your own product:
CSS instances can self-update from a repository. Users will see a notice that updates are available, and CSS will restart after installing them. In an operational setup it is typically of advantage to control which updates become available when and how, which means that each site that uses CSS will need its own, local update server from which its CSS instances pull updates that apply to their local CSS product.
A plug-in can depend on other plug-ins. For example, a data plotting plug-in depends on others which provide access to archived data, to live data, and it also depends on a plotting plugin. When adding a plotting plugin to a product, such direct dependencies are obvious and Eclipse can help to add them to the product. There are, however, additional dependencies that Eclipse cannot automatically determine.
For example, the plug-in on which the plotting tool directly depends to read archived data only defines the programming interface for reading historic data. CSS is designed to support multiple sources of archived data, for example the XML-RPC network data server of the Channel Archiver but also an RDB-based archive. Some sites use the former, others the latter, some might use both and other sites might use an entirely different archive data store. Similar examples exist for access to an electronic log-book, or to reading live control system data.
Eclipse cannot automatically decide which implementing plug-in are necessary at a site, so it is up to the creator of a CSS product to select among the available plug-ins that implement access to archived data, a log book or live data. She might even need to implement a new, site-specific way of reading historic data or writing to a log book.
As just described, we often need more than one plug-in to provide
a certain functionality, for example the databrowser plug-in
with its immediate dependencies combined with a site-specific selection of
log book, live and historic data implementations.
Directly listing all plug-ins in a product configuration would result in
a long list that is hard to maintain.
A feature is simply a list of related plug-ins, for example all plug-ins that a site uses for the Data Browser functionality. Features can also be used to modularize the head-less built, and features can appear as separate, optional components in an update repository, allowing end users to install them into their CSS product on demand.
We will now walk through the steps of creating a custom product. In the end, there will only be very little code. After all the whole point of CSS is that you can use existing plugins without having to implement everything yourself.
But unfortunately there are many pitfalls when assembling a product. It can be helpful to start small, for example try to assemble a product that only includes Probe, and get that to function as desired. Adding many more plugins for the Data Browser, operator interface etc. will then be comparably easy.
Fundamentally, an RCP Product is a plugin that implements the
org.eclipse.core.runtime.applications extension point,
and has a *.product file.
The application extension point represents the “main” routine
of the program, and the product file lists all plugins that you want to include
in your product.
A CSS application should create a workbench window with certain menus into which other CSS plugins can then add their entries. Similarly, it needs to create a skeleton for the online help and preference system. Existing CSS plugins can be used to provide these.
Create a new plugin. The suggested name is org.csstudio.
followed by your site name and ending in .product,
for example org.csstudio.mysite.product.
Add these dependencies:
org.eclipse.core.runtime- Defines the application extension point.
org.eclipse.ui.intro,org.eclipse.ui.intro.universal- Will later be used to implement the “Welcome” screen.
org.csstudio.startup- Provides basic CSS-compliant application code.
org.csstudio.utility.product- Provides extensions to the basic CSS-compliant application code.
Fundamentally, the application code of an RCP product
is allowed to do pretty much anything.
CSS end-user products, however, are expected to have
a main window, a menu bar as described in Chapter 26, CSS menus - org.csstudio.ui.menu,
and support for online help.
A CSS product should support opening documents from the command line,
see Chapter 29, Opening Files from Command-Line - org.csstudio.openfile.
To simplify the creation of a compliant product,
the org.csstudio.startup plugin provides
the essential application code and extension points for
customizing it according to local needs.
Commonly used implementations of these extension points
in turn are provided by the plugin
org.csstudio.utility.product.
Using these two plugins, a site-specific product can
often be created without having to implement any
application code.
In the new product plugin, extend the org.eclipse.core.runtime.applications
extension point.
As an ID, you can simply enter “application” which will result
in a complete ID of org.csstudio.mysite.product.application.
Add a “run” element with value
org.csstudio.startup.application.Application,
i.e. use the skeleton implementation from the CSS startup plugin.
The plugin org.csstudio.startup
defines an extension point for customizing the behavior
of its application code.
In the new product plugin, extend this point which is called
org.csstudio.startup.module
and add parameters to it so that the corresponding section of
your plugin.xml file looks as follows:
<extension point="org.csstudio.startup.module">
  <startupParameters
    class="org.csstudio.utility.product.StartupParameters">
  </startupParameters>
  <project
    class="org.csstudio.startup.module.defaults.DefaultProject">
  </project>
  <workbench
    class="org.csstudio.utility.product.Workbench">
  </workbench>
</extension>
The startup parameters code will parse command-line parameters. The default project code asserts that your product has at least one “CSS” project in its workspace. The workbench code, finally, is the most important part: It opens the window, configures it, and executes the main loop of the RCP application.
Use the IDE wizard to create a new “Plug-in Development”,
“Product Configuration” in your product plugin.
When editing the generated .product file,
one of the first things you can set in the “General Information”
section of the “Overview” tab of the product editor
is the Name of your product.
You should use “Css” as the name,
with a capital C exactly as in Css.
(For an explanation see Chapter 29, Opening Files from Command-Line - org.csstudio.openfile).
Select the application ID defined in the previous step. Press the “New...” button next to the “Product Definition” section to create a new product ID, and in there again select your application ID.
Next you need to select if your product configuration is based on plugins or features, and then list either plugin or features in the “Dependencies” tab. Initially it is easier to base a product on plugins. You can list the application plugins that you want to include in your product, for example Probe and BOY. You then press the “Add Required Plug-ins” button, and you are done.
This approach has the disadvantage that your product consists of a long list of plugins. After the fact it will be hard to determine which plugins you wanted to include in your product to provide the user with some functionality, and which plugins had to be added because they were dependencies of those functional plugins. Also remember that you might need plugins that do not show up as direct dependencies.
In the long run your product will be easier to maintain if it is based on features. You define one feature to list the application plugins that you want for your users, and separate features to list the plugins that result from dependencies, maybe further separated into CSS core plugins and those from Eclipse. The following describes how to create those features.
Create a new “Feature” project called
org.csstudio.mysite.applications.feature.
This feature lists all the application plugins that you want to
include into your product, for example the plugins for Probe,
Data Browser, BOY. Maybe just Probe as you get started.
Start by adding your product plugin, then add the application
plugins. Some application plugins are already pre-aggregated into
features, for example
org.csstudio.opibuilder.feature.
You can add individual plugins or make your applications feature
include other features.
Add the applications feature as a dependency to your
*.product.
Similar to the eclipse feature, create a feature
called org.csstudio.mysite.core.feature and add it as
a dependency to your product.
This feature will list all “core” CSS plugins that your application
plugins need.
By separating these supporting plugins from the application plugins that
the end user sees, it will be easier to maintain your product in the long run.
Some plugin that you will have to add:
-
org.csstudio.startup- Required by our product -
org.csstudio.utility.product- ditto -
org.csstudio.ui.menu- Define CSS menu structure -
org.csstudio.ui.help- Define CSS help structure
We will soon add more core plugins.
Add the core feature as a dependency to your *.product.
Finally, create an eclipse feature.
This feature will list all Eclipse plugins, i.e. plugins that CSS uses but
which are provided by Eclipse.
It is unfortunately not very easy to determine which Eclipse plugins you
need to include in your product, and details will change between versions
of Eclipse.
For this reason it is useful to list them in their own feature.
Start by adding org.eclipse.core.runtime to your
eclipse feature, then add the eclipse feature
as a dependency to your *.product.
When a product is based on features, some manual labor will
be required to add direct plugin dependencies to the
core respectively eclipse features.
This will be painful. If you base your product on plugins, Eclipse can add all required plugins via a simple click of a button. But when you base your product on features, Eclipse cannot tell to which of the features the missing plugins should be added. You will have to do this. Still, in the long run your product should be easier to maintain if it is based on features, so hang in there.
Start by trying to run the new product from within the IDE:
Open the *.product file, press “Synchronize”
and then “Launch an Eclipse Application”.
Your product will not start.
Instead, you will see many error messages, including
“The application could not start. Would you like to view the log?”.
You can select to see the errors in the Error log view,
which is typically more convenient,
or you can read the plain log file that looks like this:
!MESSAGE Bundle .../org.csstudio.ui.help/ was not resolved.
!MESSAGE Missing required bundle org.eclipse.help.ui_0.0.0
This means that the plugin org.eclipse.help.ui is a missing direct dependency
of your product. Add all missing plugins with names starting in org.csstudio into your
core feature, and add the missing Eclipse plugins into your eclipse
feature.
For some missing dependencies you will find that they are available
in system-specific variants.
One example is file system access.
Your product might require a plugin
org.eclipse.core.filesystem.
When you add it to your eclipse feature, you will notice that
there are similarly named
plugins org.eclipse.core.filesystem.win32.x86
and org.eclipse.core.filesystem.macosx because details of file
systems differ between operating systems.
You should go ahead and add all variants, because eventually you want to build
your product for multiple architectures.
When doing this, however, you should configure the feature to only include
those plugins on the appropriate target architecture.
In the feature editor, you can enter the operating systems and architecture for each
plugin. In the generated feature.xml file, it should look like this:
<plugin
   id="org.eclipse.core.filesystem.win32.x86"
   os="win32"
   arch="x86"
   ...
This way your product will include the Windows-specific file system support for x86 architectures, but only when your product is actually compiled for that target architecture.
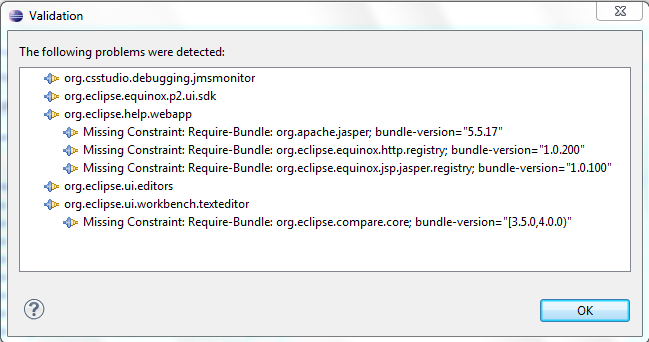
Another display of missing plugin dependencies is available from the menu “Run”, “Run Configurations...”. Locate the Eclipse Application entry for your product, select the “Plug-ins” tab and press the “Validate Plug-Ins” button. It will open a display of missing dependencies as shown in Figure 16.2, “Plug-in Dependency Validator”.
Continue to add missing dependencies to your features, occasionally pressing “Synchronize” and then “Launch an Eclipse Application” in your product to see which dependencies are still required.
Eventually, your product should run.
Congratulations! You just managed to overcome the most difficult part of getting started with a site-specific setup of CSS.
When you now add more plugins to your product, it is usually much easier to identify the required plugins because they will be direct dependencies of the added plugins. After a change in the Eclipse version, modifications to your product will mostly be limited to the eclipse feature.
Java code always runs within a limited memory environment. The JVM emposes an upper limit on the amount of memory that it requests from the operating system. This means that a Java program is very unlikely to exhaust all the computer's memory and have a negative impact on other applications running on the same machine. On the other hand, if your product contains enough plugins or is used in a way that requires a lot of memory, your log file (see the section called “Log File”) can indicate out-of-memory errors because the JVM hit its self-imposed limit. Portions of CSS will stop functioning as expected: Display stops updating, new windows fail to open. The CSS product for your site should therefore be configured to allow for sufficient memory for its expected use, while at the same time not consuming all the computer's memory.
For Eclipse RCP products, these limits can be configured in the product file:
- Open the
*.productfile - In the product configuration editor, select the “Launching” tab.
- Enter JVM memory settings in the “VM Arguments” field.
The following will allow the JVM to fetch up to 1GB of dynamic memory and 128MB of code space:
-Xmx1024m
-XX:MaxPermSize=128M
The settings it the *.product file take effect the next time
you build the product binary.
If you run the product within the IDE during development and testing, you need to update
the memory settings in the run configuration of the product.
To adjust the settings of an existing product binary, you can add or edit the same commands
in the *.ini of the product. The ini file has the same name as the application
launcher, but with “.ini” as an extension.
For Mac OS X, is is located in the *.app/Contents/MacOS folder of the product binary.
Unfortunately, it is hard to predict the best memory setting. You will have to try your product for a while in common use cases to determine how much memory you should allow.
In this section explanation is given on how to customize product's splash screen, desktop icons, etc.
To change the default CS-Studio desktop icon:
-
Put 16×16, 32×32, 48×48, 64×64, 128×128, and 256×256
.pngfiles,.icns.ico, and a 48×48.xpminto a rooticonsfolder inside the product plugin. Be sure to includeiconsinto thebin.includessection of the plugin'sbuild.propertiesfile. -
Reference these files from the Branding page of the product configuration. For example, the 16x16 Image should be
/pruduct-plugin/icons/icon16.png, where pruduct-plugin is the pruduct plugin's ID, and icon16.png is the filename of the 16×16 icon. -
Copy the previous icon files into the
repository/iconsfolder of the main product project. -
Reference these files from the Launching page of the product configuration. For each Program Launcher specify the icon in a relative form, e.g.
/icons/icon.icnsfor the MacOS X icon file named icon.icns.
To customize the splash screen use the org.csstudio.product/build/ImageLabeler-2.0.jar to
add branding information to the org.csstudio.product/plugins/org.csstudio.product/splash-template.bmp.
Here the usage of the program when run without parameters:
Usage: java -jar ImageLabeler-2.0.jar <version> <xPosition> <yPosition> <template.bmp> <splash.bmp>
                                     [<affiliation>  <xAffPosition> <yAffPosition>
                                     [<icon> <xIconPosition> <yIconPosition>]]
Where:
  <version>       is the version string,
  <xPosition>     is the right X coordinate of the version string,
  <yPosition>     is the baseline Y coordinate of the version string,
  <template.bmp>  is the pathname of the template bitmap file,
  <splash.bmp>    is the pathname of the generated (annotated) splash-screen bitmap,
  <affiliation>   is an optional affiliation text,
  <xAffPosition>  is the left X coordinate of the affiliation string,
  <yAffPosition>  is the baseline Y coordinate of the affiliation string,
  <icon>          is an optional icon,
  <xIconPosition> is the left X coordinate of the icon,
  <yIconPosition> is the top Y coordinate of the icon.
For example, the splash screen image used for the community edition can be seen in Figure 16.3, “Community Edition splash screen image.”.
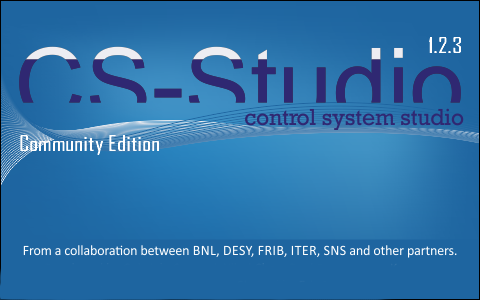
It was created with the following command:
	cs /somewhere/org.csstudio.product
	java -jar build/ImageLabeler-2.0.jar "1.2.3" 462 53 plugins/org.csstudio.product/splash-template.bmp plugins/org.csstudio.product/splash.bmp "Community Edition" 19 151
The generated MacOS X application has a Info.plist file that is not perfect.
To furter customize it, bein that is not possible to provide a custom one to Eclipse, it is necessary use the
fix-info-plist-maven-plugin
Maven plugin.
For an example on how to customize the Info.plist file see
org.csstudio.ess.product/pom.xml
at lines 52-58, where the plugin is loaded, and
org.csstudio.ess.product/repository/pom.xml
at line 51, where the phase is defined, and at lines 58-113, where the plugin parameters are defined.