Table of Contents
The update repository is part of the P2
provisioning system.
It allows users to install additional components into CSS.
For example, the basic CSS product for your site might not
include the alarm system user interface.
Interested users can add it to CSS via the
menu Help, Install New Software...
The update mechanism further supports automated updates of already installed software to a new version, for example by prompting users if they want to update whenever a new version becomes available.
Products that use P2 maintain their installation state. P2 tracks all the plugins and their versions that constitute the product. The product can be updated to a newer version from an update site, and in case of problems a product configuration can also be reverted back to a previous state.
We will briefly describe its usage, then how to create the necessary update site.
Usage of the update mechanism from the final product is relatively easy once the update site is in place. Most of the time, users to nothing. If an update becomes available, a small notification “Updates available. ... Click here to install” will appear the next time CSS is started. Users follow the sequence of dialogs, finally CSS restarts with the new updates in place.
A menu entry Help, Check for Updates
can be used to trigger this process while Eclipse is already running.
Via the menu Help, Install New Software...
users can install additional, optional software from the repository.
Finally, the menu Help, About,
Installation Details provides access to the history
of installed updates and allows you to revert to a previous state,
i.e. to un-install software that has been added.
When you export a product from the IDE as described in the section called “Product Export from IDE”, or when you perform a headless build of a product as per the section called “Headless Build”, you can select to not only build the product but also generate an update repository.
In the IDE export, check the option
“Generate metadata repository”.
Eclipse will export the product and in addition
create a directory called repository.
In the headless build, set
p2.gathering=true
in your build.properties file,
and Eclipse will create a directory buildRepo.
The update repository contains files content.xml
and artifacts.xml (or jar file equivalents)
as well as sub-directories with features, plugins and binaries.
By publishing this directory structure on a web server, P2-enabled products can then use the URL to that directory for online updates.
To enable an RCP product to use an update site, you need to do this:
-
Include the P2 client tools.
By including the feature
org.eclipse.equinox.p2.user.ui
in your product, you have the complete P2 GUI to support for example the menu
Help,Check for UpdatesandHelp,Install new Software... -
Configure for your update site.
Ideally, your product is already configured to look for updates on your update site, and maybe even performs this automatically with little user interaction.
To include your update site in the configuration of your product, create a file
p2.infin your product plugin. The build tools will use this to configure the product at the end of the build:# Define P2 repository, see # http://wiki.eclipse.org/Equinox/p2/Engine/Touchpoint_Instructions # http://www.ralfebert.de/blog/eclipsercp/p2_updates_tutorial/ instructions.configure=\ addRepository(type:0,name: My Update Site,\ location:http${#58}//www.my.site/css/updates/);\ addRepository(type:1,name: My Update Site,\ location:http${#58}//www.my.site/css/updates/);If you want your product to check for updates on each startup, prompting the user if she would like to perform the update, add this to the
plugin_customization.iniof your product:## P2 Updates: Enable check on startup. # Only check, don't download org.eclipse.equinox.p2.ui.sdk.scheduler/enabled=true org.eclipse.equinox.p2.ui.sdk.scheduler/schedule=on-startup org.eclipse.equinox.p2.ui.sdk.scheduler/download=false
When you use online updates of our product, you need to pay attention to the version numbers of your plugins. When you change a plugin, you need to increment its version number so that P2 can detect a new version and support an update to that new version.
It is a good idea to use version numbers that end in .qualifier
like
1.2.3.qualifier
The headless build will replace that qualifier with the current date and time, guaranteeing that the plugin has a unique version number even if you occasionally forget to increment the version number.
The headless build default for the qualifier replacement, i.e. date and time,
can be a problem when you run a scripted build of several products.
Your products will likely share some core CSS plugins, say org.csstudio.logging.
With the default qualifier replacements, the headless build will create binaries like
org.csstudio.logging_3.0.0.v201108181010.jar,
org.csstudio.logging_3.0.0.v201108181011.jar,
org.csstudio.logging_3.0.0.v201108181012.jar,
that is different versions because the same plugin is re-built for each product with a slightly
different time stamp.
A better solution might be to call your headless build with an option to defines a qualifier that only includes the current date, not time:
java -jar .../org.eclipse.equinox.launcher_*.jar \
  -application org.eclipse.ant.core.antRunner \
  ...
  -Dqualifier=`date "+%Y%m%d"` \
In your headless build configuration file,
build.properties,
you then use that variable as a qualifier:
# build.properties
product=...
...
forceContextQualifier=${qualifier}
...
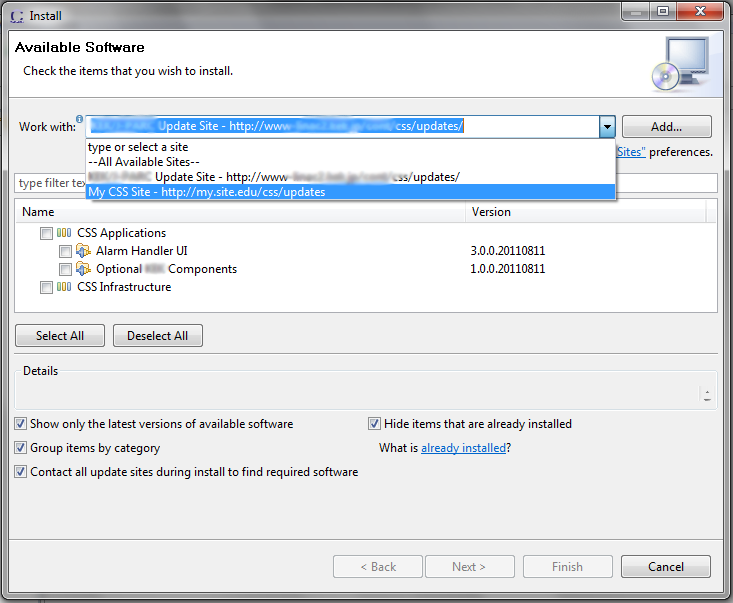
When you review the user interface for installing additional features from a P2 repository, Figure 18.1, “Installing from an Update Site”, note the option to “Group items by category”. By default it will be selected, meaning that only features that are categorized will be displayed in the dialog.
When you try to use your update repository for the first time and wonder why you cannot find any of the expected content on your update site, try if de-selecting that option will reveal your updates. If it does, you are missing category definitions for your features.
To list your features in categories, create a file
category.xml
via File, New, Plug-in Development, Category Definition
and list all your features.
In the headless build configuration for your products and features, reference that category file:
# build.properties
topLevelElementType=feature
topLevelElementId=org.csstudio....
...
# Use absolute path or maybe path relative to the builder directory
p2.category.definition=file:${builder}/../category.xml
...
Your update repository can contain all the plugins for more than one version of a product. It can even contain the components for different products. This can be useful to allow updates of older versions of a product to either the latest or an intermediate version. You can update from say version 1.0 to 1.1, then to 1.2, then to 1.3, revert to 1.0, then directly update to 1.3.
To create a repository that contains multiple versions,
you can simply leave an existing repository
respectively buildRepo directory in place
when you perform the new build.
Eclipse P2 will add to the existing repository, it will not replace it.
You might, however, prefer to have better control over the content of your repository:
What if you want to reduce the size of your repository by deleting some older versions?
What happens to the repository when a build fails?
One suggestion is to always build a new repository via the headless build. Start with an empty repository, then copy the repository generated for a specific version into versioned subdirectories on the web server:
/path/to/web/root/css/updates/repo1.0
/path/to/web/root/css/updates/repo1.1
/path/to/web/root/css/updates/repo1.2
/path/to/web/root/css/updates/repo1.3
...
This way it is easy to delete the repository for a selected version. Next, combine those versions that you intend to expose to users with the P2 mirror application. A script similar to this will copy or add one repository to another:
# Mirror one P2 repository to another
# Mirror the metadata
java -jar $ECLIPSE/plugins/org.eclipse.equinox.launcher_*.jar \
  -application org.eclipse.equinox.p2.metadata.repository.mirrorApplication \
  -source  $SOURCE -destination $DEST
# Mirror the artifacts
java -jar $ECLIPSE/plugins/org.eclipse.equinox.launcher_*.jar \
  -application org.eclipse.equinox.p2.artifact.repository.mirrorApplication \
  -verbose \
  -compare \
  -source  $SOURCE -destination $DEST
Given such a mirror script, you can assemble a repository as desired:
cd /path/to/web/root/css/updates
# Delete old repository
rm -rf content.xml artifacts.xml binary features plugins
# Include versions 1.0 and 1.3 in combined repository
mirror.sh repo1.0 .
mirror.sh repo1.3 .